Showing posts with label projects. Show all posts

Tuesday, December 22, 2015

In which the success of one project tanks something that was working well.

The cats were intently watching something out the back door, so I went to see what they were looking at. I assumed it was a bird, as I have installed suet feeders so they can watch the birds.  The feeders hang from the beam that serves as the support beam for the upper porch. This has been a great location as only birds can access the suet feeders.

Or so I thought.  

What the cats were looking at was a squirrel perched at the top of the rolled up catio fence.  This sits on the right-hand side of the porch. I keep it rolled up there because the right side of the catio can remain attached and I need only hook up the left side when I put the catio up.

The squirrel and I looked at each other for a while, until I went to get my camera so I could document whatever he had planned.  I came back and stretched out on the floor so I could look up at the porch.

Here's what I saw:  the squirrel, having made it halfway up the side of the house via the catio fence, scurried up the corner of the porch.  He disappeared from sight briefly, but reappeared hanging from the upper porch deck.  Then he used his front paws and hauled in--paw over paw, as if he was a sailor on the high seas--the suet feeder until he could chew on the suet.

And that's what he did.  He just kept eating the suet while I took a bunch of pictures.  I realized that the quick depletion of suet was not due to the starlings, but instead probably squirrels.

Sentinel and I watched (Antares had slunk away) for some time.  I was disgusted at the squirrel's ingenuity, Sentinel was interested in eating the squirrel.

Eventually there was no suet left, so the squirrel made his way down to the ground and started eating the large chunks of suet that had dropped from above.  He continued this despite my rearing up and standing full height.

Disgusted, I eventually let Sentinel outside to scare the squirrel and his buddy off.  Sentinel hopped outside, both squirrels took off, and I herded Sentinel back inside while I set up the catio as a reward for the cats' vigilance.  If they hadn't stared so intently, it might have taken me some time to figure out that squirrels were eating my suet.
As it is, I will have to relocate my feeders.  I'm thinking maybe the middle of the deck ceiling will work.  They would have to be ninja squirrels to stay upside down for that long.

Monday, July 20, 2015

The list has been completed.

Back on May 21, 2007, I posted a list of project priorities.  This was so long ago, it appears on the stub of a blog that was the precursor to this one.  At the time, we had owned our house for a little over a month.

[Here we pause while I read back over other posts like this one, about our previous apartment.]

For the new house, I typed up the list of prioritized projects and taped it to the wall and began chipping away at them.

I'm here to report that with the removal of the white dresser, and the instillation of the Billy bookcases, the list has been completed!  It only took 8 years.

Things have changed since I made up the list.  We no longer have a bedroom and an office, for instance, as each of us has our own bedrooms. In the pantry area the first priority (scoring 100%) was the black shelf that I eventually decided I didn't like very much and it went out on the curb.  Some projects never came to fruition, like "shelves, great room, stairwell."  At one time I thought I would put floating shelves there, but the space is occupied by mirrors.

But there was a lot of work that went into completing that list and it feels good to have it done.

Sunday, June 21, 2015

How to install fabric panels to your Ikea Morliden Glass Doors

You've bought your Morliden Glass Doors to go on your Billy Bookcases. And you've bought the material to add a personal touch.  Now here is a step-by-step tutorial for installing the fabric into the glass doors.

First, remove the black/white panel from the glass door and set the glass door where it will be safe from both smudges and breakage. Set the panel on top of the WRONG side of your fabric.

Determine what part of the fabric to use for your panel and make sure everything is straight.  I did this by lining up the panel one half inch from the selvages.  I measured from both ends.  If your fabric is tricky, or has repeats, you might need to do a lot of figuring for this step.

Double and triple check that everything is straight.

Get out your item you will use to mark your fabric. I am using the Clover Chaco Liner in yellow, which I find to be the most amazing marker ever for woven fabrics.  However, you might use pencil (lightly on the wrong side), disappearing ink marking pen, tailors chalk or possibly, depending on how gutsy you feel, pen.

My main question was should I mark right up against the panel, or add an extra allowance of fabric?  The answer is:  make your mark right up against the panel.

Cut carefully along your chalk lines.  Then set the glass door on the table, with the side which will get the fabric and panel facing up.  Do NOT put your fabric in at this time.  Instead, stretch a scrap of fabric (or some yarn or string) across the glass panel. 

Set the panel into the glass.  Again, there is NO fabric between the panel and the glass except for the scrap/string/yarn.  When you put your panel in, put the side that will be on the inside (that is, against the fabric) facing up.

Use whatever screwdriver you are using to attach the hinges, following the directions.  This was the hardest step for me.  My advice is to make sure the panel is fully seated in the glass area and to get that hinge to "click in" (it will happen and you will see what I mean) before you start turning those screws.

It is important to put the wrong side of the panel facing up in this step because you might make smudges or marks on it as I have.  Happily, no one will ever see those marks.

Use your scrap of fabric/yarn/string to easily remove the panel from the glass door.  If you have neglected to do this, use a butter knife to lever the panel up and away from the glass.

Place your fabric onto the glass door and smooth it, double checking it's sitting exactly as you want it.  When you set the panel in, you have to slide the panel under the hinges while not moving the fabric too much. I found that one end fits in nicely, and then you can hold the fabric on the side opposite the other one while you slide the panel under the hinge.  Be sure to keep a finger under the panel until you are moderately sure everything is even.

Grab your scrap of fabric/yarn/string and lay it across the corner of the panel, before letting the panel seat itself into the glass door.

Stand the door up and double check that everything is as you want it.  Make sure you look all the way around the perimeter and also check to see if wrinkles have somehow made their way into the picture.

If something has gone wrong, use the scrap material in the corner to lift the panel and adjust everything.  Check again and keep adjusting and checking until everything is right.

When everything is as you want it, remove and discard the scrap/yarn/string.  Place the tabs in as shown in the directions.  This was another sweaty part.  My advice is to make sure the panel is fully seated in the glass and apply strong pressure as you turn the screwdriver.
Install your doors following the directions. Sit back and admire your work.
If you have questions or comments, please add a comment to this post.

Saturday, June 20, 2015

Finished the Morliden doors for the Billy bookshelves

You may recall that I ran out of time with this project.  But today, we will finish.

Here is the full effect.

And here it is as you come through the door.
Unfortunately, I'm not thrilled with the end product.  A lot of time was spent picking the material, but I think our choice ended up being too busy.  I would like to redo them in a more solid color, or a batik, but that will have to wait until an unknown point in the future.  In the meantime, I will be happy that the shelves are closed off behind glass.

Saturday, June 13, 2015

Morliden Doors for Billy Bookcase part I

With Julie's assistance, I have purchased fabric for my Morliden glass doors from Ikea.  This means I am close to finishing my bookcase project.

Here I measure the fabric for insertion behind the glass panel.

Some of my tools.  Super cool see-through ruler bought as part of the Pattern Manipulation Class at PCC this spring.  Also, clover marking pen which is the best marking pen I've ever purchased.

I only finished three before it was time for our date.  So here are the results mid-project.

Friday, June 12, 2015

First Friday of summer schedule. Project: Cat Litter Box Area Upgrade

Usually in May I get a surge of energy and suddenly think of a ton of super awesome projects that, when completed, will make my life much better.  Sadly, that energy doesn't stay around forever, so many are put on a list and may or may not be gotten around to.

This cat litter box update was one of those May ideas.  Happily, it came to pass rather quickly. 

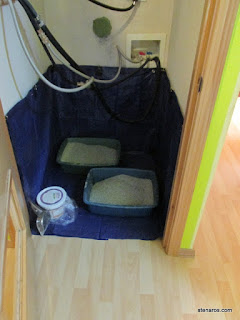
Before.  Back when we had Organics to You Deliver produce to us, I used the leftover boxes which perfectly fit this area.  Three lined the sides, one per side and one on the bottom.  My cats are very good about actually respecting the boundaries of the box, but every once in a while, one of them (I suspect Antares) will spray the wall.  When that happened, I simply switched out the boxes for new ones and life happily went on.  Eventually we stopped having produce delivered to us and my box supply dried up.  I would then cobble together some boxes that didn't quite fit, as in the example below.  Then, I never wanted to change them because where would I get more boxes?  This project solves this problem.

After making a paper mock-up to test if my spacial relations were correct, I bought my supplies:  two tarps, anchors, and hooks.  We already had duct tape. 

Here, I measure my area using the tarp.

  I placed three anchors/hooks on each wall so the tarp could hang from them. The tarp grommets didn't occur often enough, so I made my own by placing two layers of duct tape along the edge of the tarp and cut squares into the tape.

I then measured the length of my tarp and cut it to size.  The shorter pieces are the sides, which are long enough to fold over each other, covering the bottom from each side..  The long piece is the back, which will drop down over the side pieces and make a smooth surface along the bottom.

Sentinel came to help me prep the second tarp.

Here's the second tarp, fashioned by using the first tarp as a pattern.  I used clothespins to hold the top layers evenly together because I needed my homemade grommets to line up precisely.  I also reinforced the folding corners with duct tape.  I had thoughts of wrapping all the cut edges in duct tape, but decided it wasn't necessary.

How it all came together.

This is a picture of the top piece elevated, so you can see how the sides overlap.

The new setup with litter boxes.
Now I can brush the kicked litter back into the pans more easily. When it's time to change everything out, I can fold up all the bits of litter I can't sweep up into my tarp and take it outside to hose off.  While it is drying, I can put my second tarp back in so the interruption in service is minimal.

I am quite pleased with this project.  Total time was less than three hours. Total cost around $25.00.  It could have probably been cheaper as the tarps seemed quite expensive, but I wasn't willing to go to another store.

Monday, May 25, 2015

The finished-for-now product

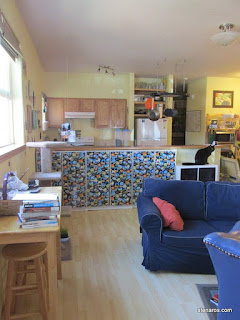
No longer do you see the white dresser when you come in.  Now you see bookcases.

My plan was to have two bookcases with glass doors and one without, but I've changed my mind and all three need to have glass doors. The doors I bought can be customized with panels of material and after installing one set of doors, I concluded that it will be easier to customize before the doors are installed.  So instillation of the other two sets of doors has been put on hold.
Even though Billy and I didn't get along at the beginning, I'm happy to have embarked on this project.

Sunday, May 24, 2015

Mind blown. Sometimes you have a trapezoid instead of a rectangle.

Cutting three-quarters of an inch off the bottom of the bookcases fixed the height problem.  But as I was installing them I noticed something.  The first shelf went in and one side went further back than the other.  I did some exploratory pushing and things didn't even out.  So I kept on keeping on, which is often what I do when confused during projects. 

The next bookshelf had the same problem, but the amount of space covered kept getting bigger.  "Maybe this back part isn't square?" I mused.  Matt turned around, took one look and said, "nope.  There aren't two 90 degree angles on this end.

It took a while for my head to adjust, but these rulers prove it.  This end of the counter doesn't even measure 12 inches.  If you look at the other end, there is a silver 12-inch ruler that doesn't reach all the way across.  I've been living with a trapezoid and never noticed!

Here you can see how my trapezoid shrinks.  I'm pretty sure this was intentional.  Maybe to make the transition from great room to hallway/kitchen less abrupt.

Saturday, May 23, 2015

Matt sorts the white dresser.

Matt went through the white dresser and managed to knock four drawers down to one cube.  Good job Matt.

He was sad to give away his autographed VHS copy of the Awful Truth.

Also his videotape of Red Dwarf.

And his copy of Run Lola, Run.

New bookcases. Or: Billy attempts to defeat me.

Here is our "before" shot.  Since we moved in this has been a storage area with the white dresser holding a mish-mash of things, and the two orange stands holding books and music items.  There used to be a stereo system with large speakers there too.

I never like how the white dresser was the first thing people saw when they came in the door. So it's (finally) time for a change.

I bought these two stands in Somerville.  At the time, downtown Somerville had an unfinished furniture place. I bought this one first, and it was my computer desk for the iMac I briefly owned.  That was the iMac that taught me I'm not an Apple person.  I bought the second one to hold my TV/VCR combo and all my VHS movies.  They've been good little soldiers, but it is time for them to find new homes.

What I found when I moved the shelves.  A lot of dirt and the resting place for Antares' mice.

Now that I've moved everything out and scrubbed the floor, it's time to assemble the three Billy bookcases I purchased from Ikea.

And look!  One is nearly done.  

But alas, it is about 5/8th inch too high for where it needs to go.  I swear I measured.  But I guess not very well.

I set aside that problem and Sentinel came to help me assemble the Kallax shelving unit.

That went together quite nicely.  I dislike the cubes we choose to fill the Kallax shelving unit.  They remind me of a set of plastic end tables from my early 80s childhood.  Also, they seem quite fragile.  But they will work for now.

I returned to the problem of the Billy Bookshelves and measured out a solution.  The clear ruler I bought for my pattern manipulation class came in handy as I drew the line for the cuts I needed to make.

Taking another break, I filled some of the Kallax shelving unit's drawers.  Look what fits!  Albums!  I'm pretty sure some Ikea designer must have a big record collection.  Thank goodness s/he designed some furniture to hold them.

I am now the owner of a mid-range jigsaw.

All set up and ready to cut.
Stay tuned!