Usually in May I get a surge of energy and suddenly think of a ton of super awesome projects that, when completed, will make my life much better. Sadly, that energy doesn't stay around forever, so many are put on a list and may or may not be gotten around to.
This cat litter box update was one of those May ideas. Happily, it came to pass rather quickly.
Before. Back when we had Organics to You Deliver produce to us, I used the leftover boxes which perfectly fit this area. Three lined the sides, one per side and one on the bottom. My cats are very good about actually respecting the boundaries of the box, but every once in a while, one of them (I suspect Antares) will spray the wall. When that happened, I simply switched out the boxes for new ones and life happily went on. Eventually we stopped having produce delivered to us and my box supply dried up. I would then cobble together some boxes that didn't quite fit, as in the example below. Then, I never wanted to change them because where would I get more boxes? This project solves this problem.

After making a paper mock-up to test if my spacial relations were correct, I bought my supplies: two tarps, anchors, and hooks. We already had duct tape.
Here, I measure my area using the tarp.

I placed three anchors/hooks on each wall so the tarp could hang from them. The tarp grommets didn't occur often enough, so I made my own by placing two layers of duct tape along the edge of the tarp and cut squares into the tape.

I then measured the length of my tarp and cut it to size. The shorter pieces are the sides, which are long enough to fold over each other, covering the bottom from each side.. The long piece is the back, which will drop down over the side pieces and make a smooth surface along the bottom.

Sentinel came to help me prep the second tarp.

Here's the second tarp, fashioned by using the first tarp as a pattern. I used clothespins to hold the top layers evenly together because I needed my homemade grommets to line up precisely. I also reinforced the folding corners with duct tape. I had thoughts of wrapping all the cut edges in duct tape, but decided it wasn't necessary.

How it all came together.

This is a picture of the top piece elevated, so you can see how the sides overlap.

The new setup with litter boxes.
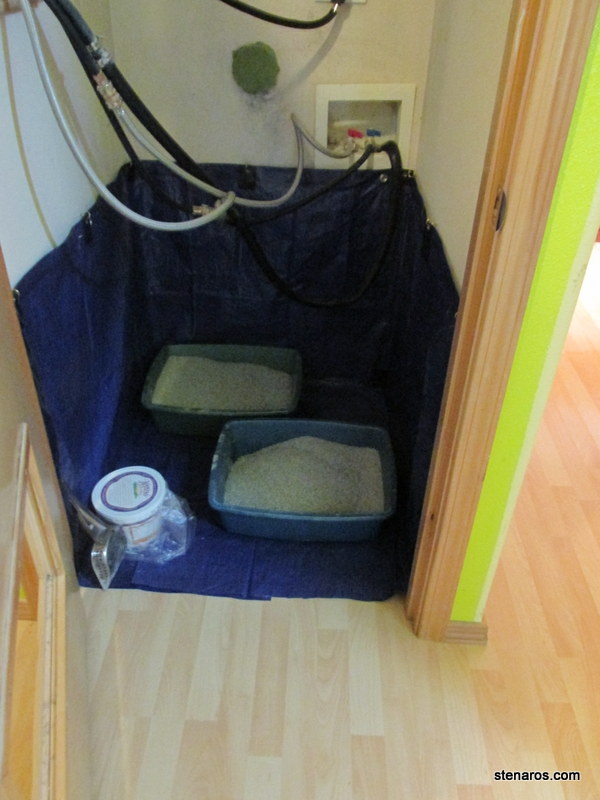
Now I can brush the kicked litter back into the pans more easily. When it's time to change everything out, I can fold up all the bits of litter I can't sweep up into my tarp and take it outside to hose off. While it is drying, I can put my second tarp back in so the interruption in service is minimal.
I am quite pleased with this project. Total time was less than three hours. Total cost around $25.00. It could have probably been cheaper as the tarps seemed quite expensive, but I wasn't willing to go to another store.
3 comments:
Once again, I'm massively impressive with your creative thinking, ingenuity, and problem solving! How are the kitties liking the new set up so far?
This is TOTALLY brilliant. I am very impressed with your clever ingenuity! The ability to switch out and the linings, and the use of the grommets. Super impressive.
Thanks guys. I think the cats don't really know the difference, although it does give them a tiny bit more space because the cardboard doesn't lean in.
On the other hand, Antares hasn't sprayed the wall since I did this, so perhaps this was what was needed to stop that intermittent activity.
Post a Comment